
释放双眼,带上耳机,听听看~!
一直想实现对Nginx前端代理的一套系统监控,研究了Nginx自带的vts,发现有一些数据无法直观的进行展示。后面看到Loki可以对Nginx进行数据采集及对应模板展示,本次环境使用Loki采集Nginx日志信息,并进行图表展示
文章目录
🤖 由 ChatGPT 生成的文章摘要
依赖组件
- Nginx vts-model Nginx 监控模块
- Loki 日志平台
- Grafana 基础组件
- GeoIP 将IP转换成国家代码,用于在地图上显示
- Promtail 采集日志
GeoIP库安装
wget https://d.frps.cn/file/tools/nginx/GeoIP-1.6.12.tar.gz
tar -xzf GeoIP-1.6.12.tar.gz
cd GeoIP-1.6.12
./configure
sudo make
sudo make install
sudo sh -c 'echo "/usr/local/lib" > /etc/ld.so.conf.d/geoip.conf'
下载GeoIP nginx模块
cd /opt
#配置文件的模块我这里全都下载在/opt下

wget https://dl.miyuru.lk/geoip/dbip/country/dbip.dat.gz
gzip -d dbip.dat.gz
mv dbip.dat GeoIP.dat

wget https://dl.miyuru.lk/geoip/dbip/city/dbip.dat.gz
gzip -d dbip.dat.gz
mv dbip.dat GeoIPCity.dat
Nginx vts-model & geoip_module
我这里已经有nginx了,不是新安装部署的,所以采用添加依赖包的方式,将模块添加进去。新安装的可以直接构建依赖包
下载nginx-module-vts模块
wget https://d.frps.cn/file/tools/nginx/model/nginx-module-vts_v0.2.2.zip解压
unzip nginx-module-vts_v0.2.2.zip使用nginx -v,添加新的nginx模块
root@frps:/www/server/nginx/src# nginx -V
nginx version: nginx/1.22.1
built by gcc 9.4.0 (Ubuntu 9.4.0-1ubuntu1~20.04.1)
built with OpenSSL 1.1.1q  5 Jul 2022
TLS SNI support enabled
configure arguments: --user=www --group=www --prefix=/www/server/nginx --add-module=/www/server/nginx/src/ngx_devel_kit --add-module=/www/server/nginx/src/lua_nginx_module --add-module=/www/server/nginx/src/ngx_cache_purge --add-module=/www/server/nginx/src/nginx-sticky-module --with-openssl=/www/server/nginx/src/openssl --with-pcre=pcre-8.43 --with-http_v2_module --with-stream --with-stream_ssl_module --with-stream_ssl_preread_module --with-http_stub_status_module --with-http_ssl_module --with-http_image_filter_module --with-http_gzip_static_module --with-http_gunzip_module --with-ipv6 --with-http_sub_module --with-http_flv_module --with-http_addition_module --with-http_realip_module --with-http_mp4_module --add-module=/www/server/nginx/src/ngx_http_substitutions_filter_module-master --with-ld-opt=-Wl,-E --with-cc-opt=-Wno-error --with-ld-opt=-ljemalloc --with-http_dav_module --add-module=/www/server/nginx/src/nginx-dav-ext-module在最后一行添加--add-module=/www/server/nginx/src/nginx-module-vts-0.2.2和--with-http_geoip_module
开始编译
root@frps:/www/server/nginx/src# ./configure --user=www --group=www --prefix=/www/server/nginx --add-module=/www/server/nginx/src/ngx_devel_kit --add-module=/www/server/nginx/src/lua_nginx_module --add-module=/www/server/nginx/src/ngx_cache_purge --add-module=/www/server/nginx/src/nginx-sticky-module --with-openssl=/www/server/nginx/src/openssl --with-pcre=pcre-8.43 --with-http_v2_module --with-stream --with-stream_ssl_module --with-stream_ssl_preread_module --with-http_stub_status_module --with-http_ssl_module --with-http_image_filter_module --with-http_gzip_static_module --with-http_gunzip_module --with-ipv6 --with-http_sub_module --with-http_flv_module --with-http_addition_module --with-http_realip_module --with-http_mp4_module --add-module=/www/server/nginx/src/ngx_http_substitutions_filter_module-master --with-ld-opt=-Wl,-E --with-cc-opt=-Wno-error --with-ld-opt=-ljemalloc --with-http_dav_module --add-module=/www/server/nginx/src/nginx-dav-ext-module --add-module=/www/server/nginx/src/nginx-module-vts-0.2.2 --with-http_geoip_module我们只需要执行make就可以
root@frps:/www/server/nginx/src# make替换nginx二进制包
root@frps:/www/server/nginx/src# nginx -s stop
root@frps:/www/server/nginx/src# cp objs/nginx /www/server/nginx/sbin/nginx
接下来,我们在最后两行就可以看到新增的模块
root@frps:/www/server/nginx/src# nginx -V
nginx version: nginx/1.22.1
built by gcc 9.4.0 (Ubuntu 9.4.0-1ubuntu1~20.04.1)
built with OpenSSL 1.1.1q  5 Jul 2022
TLS SNI support enabled
configure arguments: --user=www --group=www --prefix=/www/server/nginx --add-module=/www/server/nginx/src/ngx_devel_kit --add-module=/www/server/nginx/src/lua_nginx_module --add-module=/www/server/nginx/src/ngx_cache_purge --add-module=/www/server/nginx/src/nginx-sticky-module --with-openssl=/www/server/nginx/src/openssl --with-pcre=pcre-8.43 --with-http_v2_module --with-stream --with-stream_ssl_module --with-stream_ssl_preread_module --with-http_stub_status_module --with-http_ssl_module --with-http_image_filter_module --with-http_gzip_static_module --with-http_gunzip_module --with-ipv6 --with-http_sub_module --with-http_flv_module --with-http_addition_module --with-http_realip_module --with-http_mp4_module --add-module=/www/server/nginx/src/ngx_http_substitutions_filter_module-master --with-ld-opt=-Wl,-E --with-cc-opt=-Wno-error --with-ld-opt=-ljemalloc --with-http_dav_module --add-module=/www/server/nginx/src/nginx-dav-ext-module --add-module=/www/server/nginx/src/nginx-module-vts-0.2.2 --with-http_geoip_module
模块安装完毕后,我们需要配置模块
修改nginx配置文件
http标签下添加
geoip_country /opt/GeoIP.dat;
geoip_city /opt/GeoIPCity.dat;

# json日志格式
log_format json_analytics escape=json '{'
                            '"msec": "$msec", ' # request unixtime in seconds with a milliseconds resolution
                            '"connection": "$connection", ' # connection serial number
                            '"connection_requests": "$connection_requests", ' # number of requests made in connection
                    '"pid": "$pid", ' # process pid
                    '"request_id": "$request_id", ' # the unique request id
                    '"request_length": "$request_length", ' # request length (including headers and body)
                    '"remote_addr": "$remote_addr", ' # client IP
                    '"remote_user": "$remote_user", ' # client HTTP username
                    '"remote_port": "$remote_port", ' # client port
                    '"time_local": "$time_local", '
                    '"time_iso8601": "$time_iso8601", ' # local time in the ISO 8601 standard format
                    '"request": "$request", ' # full path no arguments if the request
                    '"request_uri": "$request_uri", ' # full path and arguments if the request
                    '"args": "$args", ' # args
                    '"status": "$status", ' # response status code
                    '"body_bytes_sent": "$body_bytes_sent", ' # the number of body bytes exclude headers sent to a client
                    '"bytes_sent": "$bytes_sent", ' # the number of bytes sent to a client
                    '"http_referer": "$http_referer", ' # HTTP referer
                    '"http_user_agent": "$http_user_agent", ' # user agent
                    '"http_x_forwarded_for": "$http_x_forwarded_for", ' # http_x_forwarded_for
                    '"http_host": "$http_host", ' # the request Host: header
                    '"server_name": "$server_name", ' # the name of the vhost serving the request
                    '"request_time": "$request_time", ' # request processing time in seconds with msec resolution
                    '"upstream": "$upstream_addr", ' # upstream backend server for proxied requests
                    '"upstream_connect_time": "$upstream_connect_time", ' # upstream handshake time incl. TLS
                    '"upstream_header_time": "$upstream_header_time", ' # time spent receiving upstream headers
                    '"upstream_response_time": "$upstream_response_time", ' # time spend receiving upstream body
                    '"upstream_response_length": "$upstream_response_length", ' # upstream response length
                    '"upstream_cache_status": "$upstream_cache_status", ' # cache HIT/MISS where applicable
                    '"ssl_protocol": "$ssl_protocol", ' # TLS protocol
                    '"ssl_cipher": "$ssl_cipher", ' # TLS cipher
                    '"scheme": "$scheme", ' # http or https
                    '"request_method": "$request_method", ' # request method
                    '"server_protocol": "$server_protocol", ' # request protocol, like HTTP/1.1 or HTTP/2.0
                    '"pipe": "$pipe", ' # "p" if request was pipelined, "." otherwise
                    '"gzip_ratio": "$gzip_ratio", '
                    '"http_cf_ray": "$http_cf_ray",'
                    '"geoip_country_code": "$geoip_country_code"'
                    '}';

 access_log logs/json_access.log json_analytics;
添加完毕后我们最好重启一下nginx
#正常日志输出

root@frps:/www/wwwlogs# cat json_access.log
{"msec": "1689214423.856", "connection": "105", "connection_requests": "1", "pid": "1636024", "request_id": "d1cad766e7270c4e8559f7006db7fe29", "request_length": "157", "remote_addr": "121.14.77.65", "remote_user": "", "remote_port": "23070", "time_local": "13/Jul/2023:10:13:43 +0800", "time_iso8601": "2023-07-13T10:13:43+08:00", "request": "GET / HTTP/1.1", "request_uri": "/", "args": "", "status": "200", "body_bytes_sent": "797", "bytes_sent": "1057", "http_referer": "", "http_user_agent": "DNSPod-Monitor/2.0", "http_x_forwarded_for": "", "http_host": "openwrt.frps.cn", "server_name": "_", "request_time": "0.000", "upstream": "", "upstream_connect_time": "", "upstream_header_time": "", "upstream_response_time": "", "upstream_response_length": "", "upstream_cache_status": "", "ssl_protocol": "", "ssl_cipher": "", "scheme": "http", "request_method": "GET", "server_protocol": "HTTP/1.1", "pipe": ".", "gzip_ratio": "1.69", "http_cf_ray": "","geoip_country_code": "CN"}
Loki 安装配置
数据存储目录(也可以不创建)
mkdir -p /opt/loki/index
mkdir -p /opt/loki/chunks
chmod -R 777 /opt/loki   #需要设置权限,否则索引创建失败
loki配置文件
cat >>/opt/loki/loki-config.yaml<<EOF
auth_enabled: false
server:
  http_listen_port: 3100 #云服务器需开放3100端口
  grpc_listen_port: 9096 #云服务器需开放9096端口
  grpc_server_max_recv_msg_size: 1073741824  #grpc最大接收消息值,默认4m
  grpc_server_max_send_msg_size: 1073741824  #grpc最大发送消息值,默认4m
ingester:
  lifecycler:
    address: 127.0.0.1
    ring:
      kvstore:
        store: inmemory
      replication_factor: 1
    final_sleep: 0s
  chunk_idle_period: 5m
  chunk_retain_period: 30s
  max_transfer_retries: 0
  max_chunk_age: 20m  #一个timeseries块在内存中的最大持续时间。如果timeseries运行的时间超过此时间,则当前块将刷新到存储并创建一个新块

schema_config:
  configs:
    - from: 2021-01-01
      store: boltdb
      object_store: filesystem
      schema: v11
      index:
        prefix: index_
        period: 168h
storage_config:
  boltdb:
    directory: /opt/loki/index #存储索引地址
  filesystem:
    directory: /opt/loki/chunks
limits_config:
  enforce_metric_name: false
  reject_old_samples: true
  reject_old_samples_max_age: 168h
  ingestion_rate_mb: 30  #修改每用户摄入速率限制,即每秒样本量,默认值为4M
  ingestion_burst_size_mb: 15  #修改每用户摄入速率限制,即每秒样本量,默认值为6M
chunk_store_config:
        #max_look_back_period: 168h   #回看日志行的最大时间,只适用于即时日志
  max_look_back_period: 0s
table_manager:
  retention_deletes_enabled: false #日志保留周期开关,默认为false
  retention_period: 0s  #日志保留周期
EOF
启动Loki服务
docker run -d \
--name loki \
--privileged=true \
-v /opt/loki:/mnt/config \
-v /opt/loki/index:/opt/loki/index \
-v /opt/loki/chunks:/opt/loki/chunks \
-p 3100:3100 \
-p 9096:9096 \
grafana/loki:2.1.0 -config.file=/mnt/config/loki-config.yaml
测试
root@frps:/opt# curl localhost:3100/loki/api/v1/labels
{"status":"success","data":["__name__"]}
Promtail 配置
Promtail 是负责收集日志发送给 loki 的代理程序,Promtail 默认通过一个 config.yaml 文件进行配置,其中包含 Promtail 服务端信息、存储位置以及如何从文件中抓取日志等配置。
我们需要在需要收集日志的节点配置Promtail
cat >>promtail-config.yaml<<EOF
server:
  http_listen_port: 9080
  grpc_listen_port: 0

positions:
  filename: /tmp/positions.yaml

clients:
  - url: http://10.0.24.9:3100/loki/api/v1/push

scrape_configs:
- job_name: nginx
  static_configs:
  - targets:
      - localhost
    labels:
      job: nginxlogs
      __path__: /var/log/json_account.log
EOF- 10.0.24.9 ip需要修改为Loki的ip
- 这里我建议写一个日志文件,也可以写多个
启动容器
docker run -d --name promtail \
  -v /www/wwwlogs:/var/log \
  -v /opt/config:/mnt/config \
  grafana/promtail \
  -config.file=/mnt/config/promtail-config.yaml
Grafana 配置
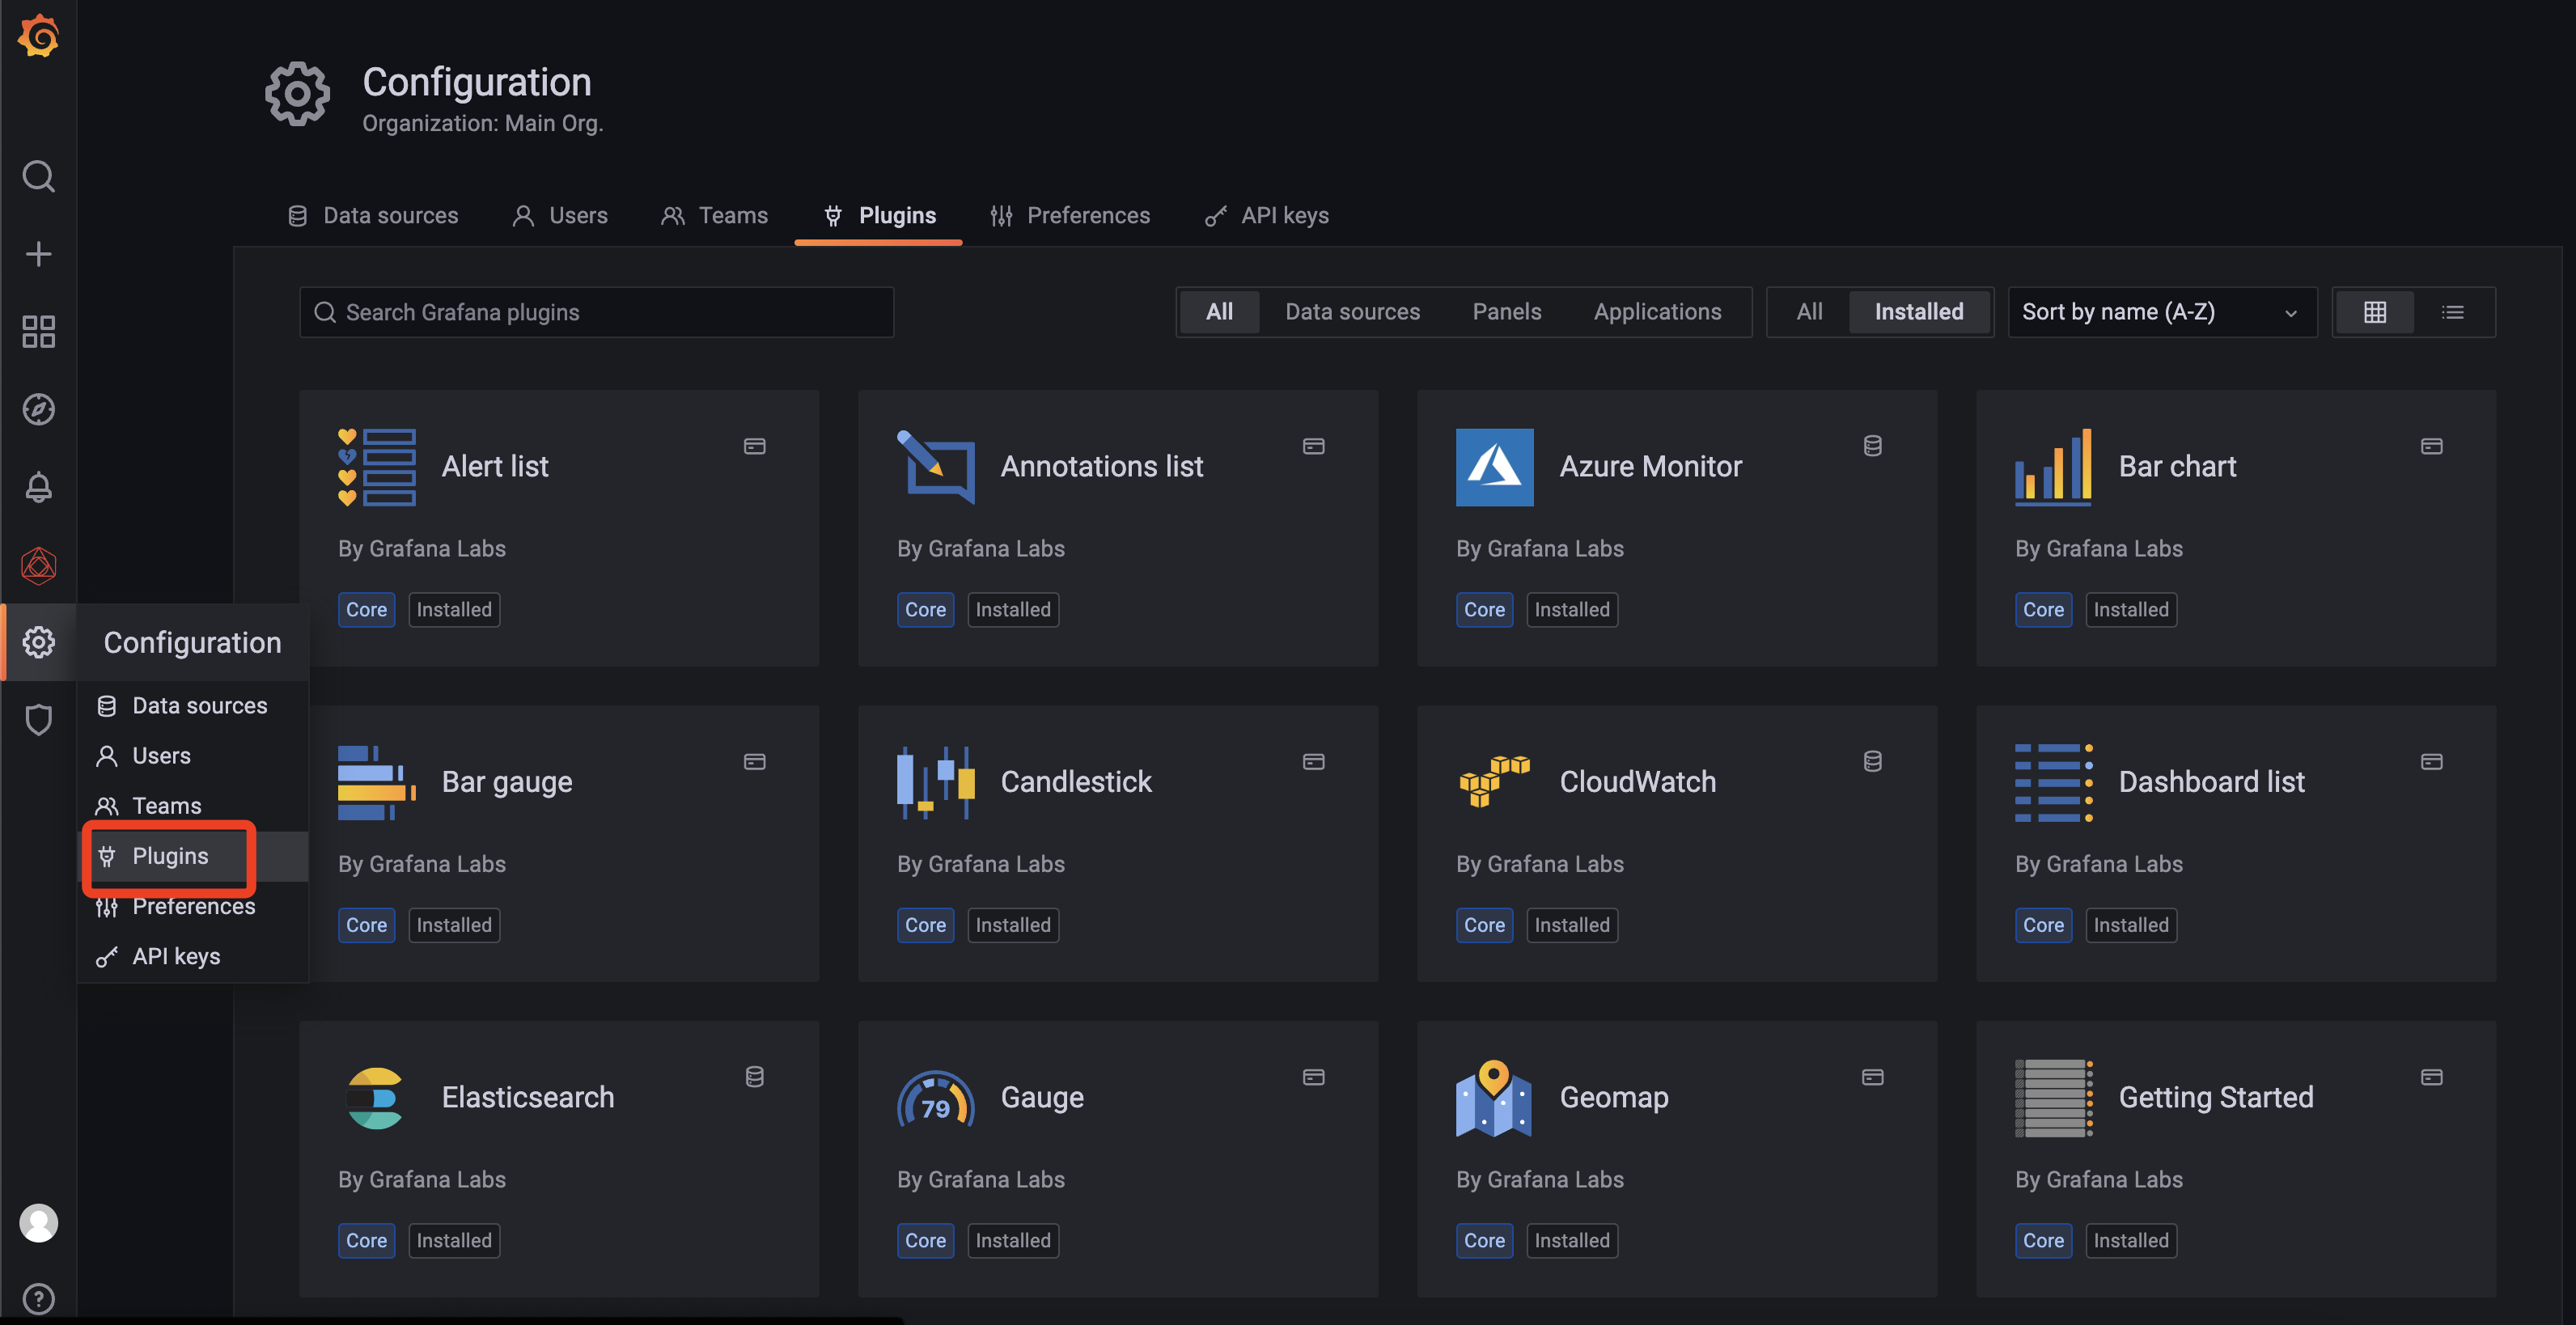
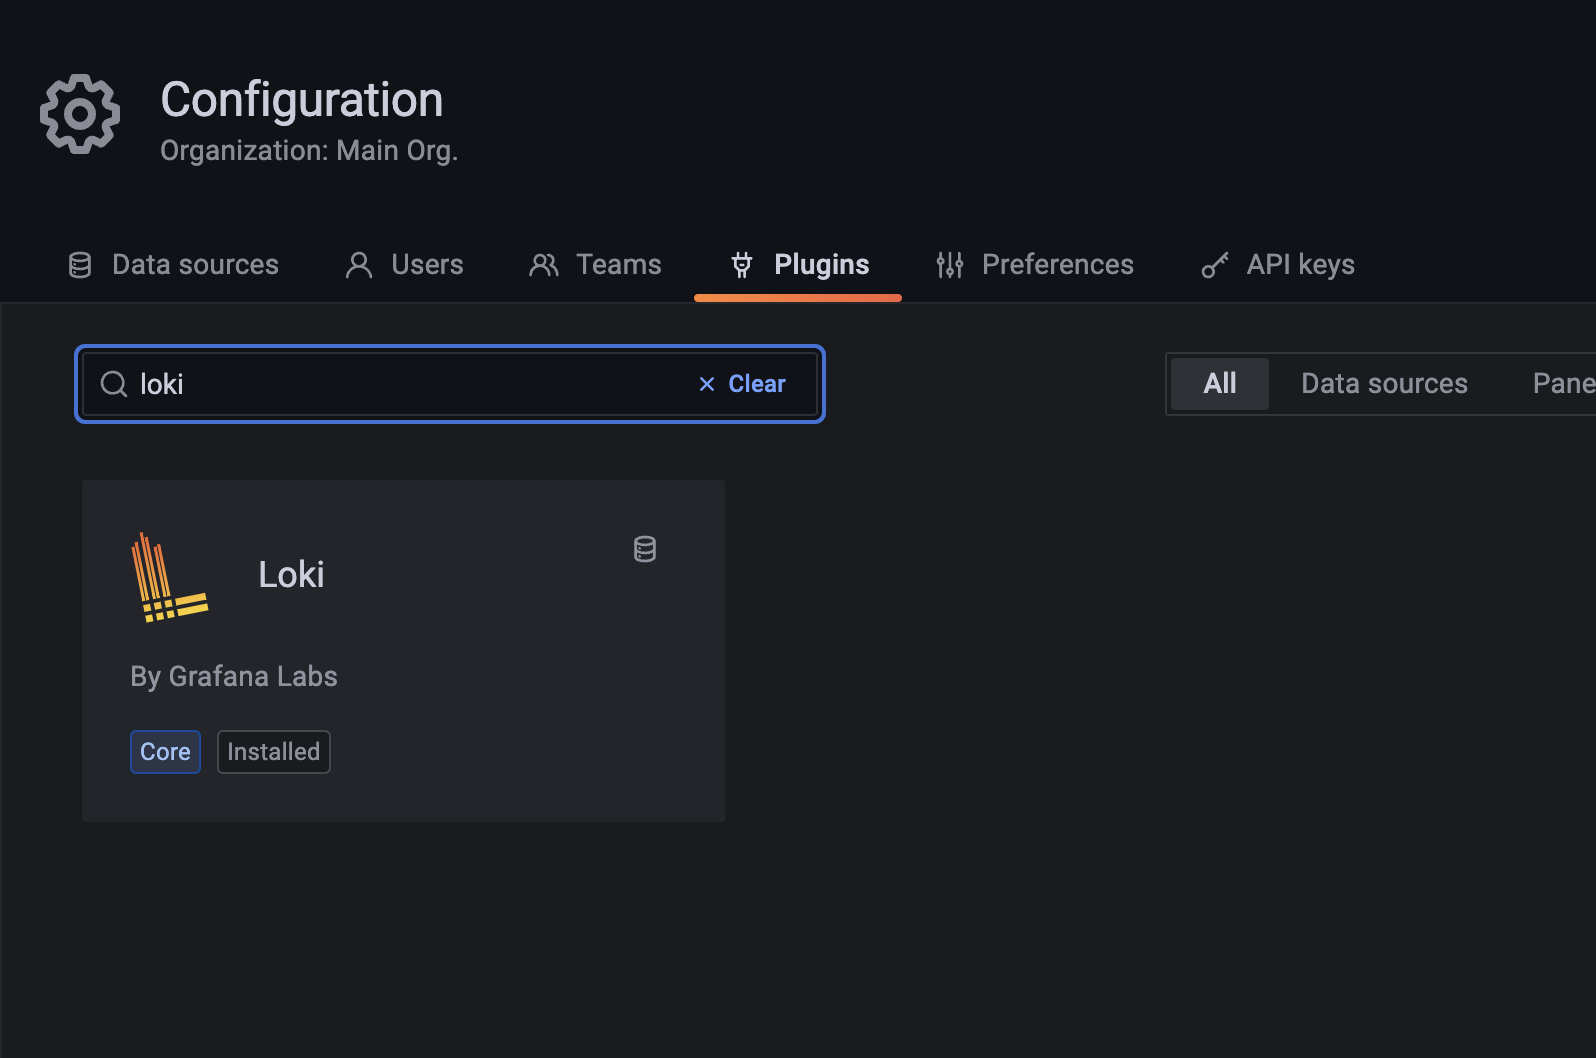
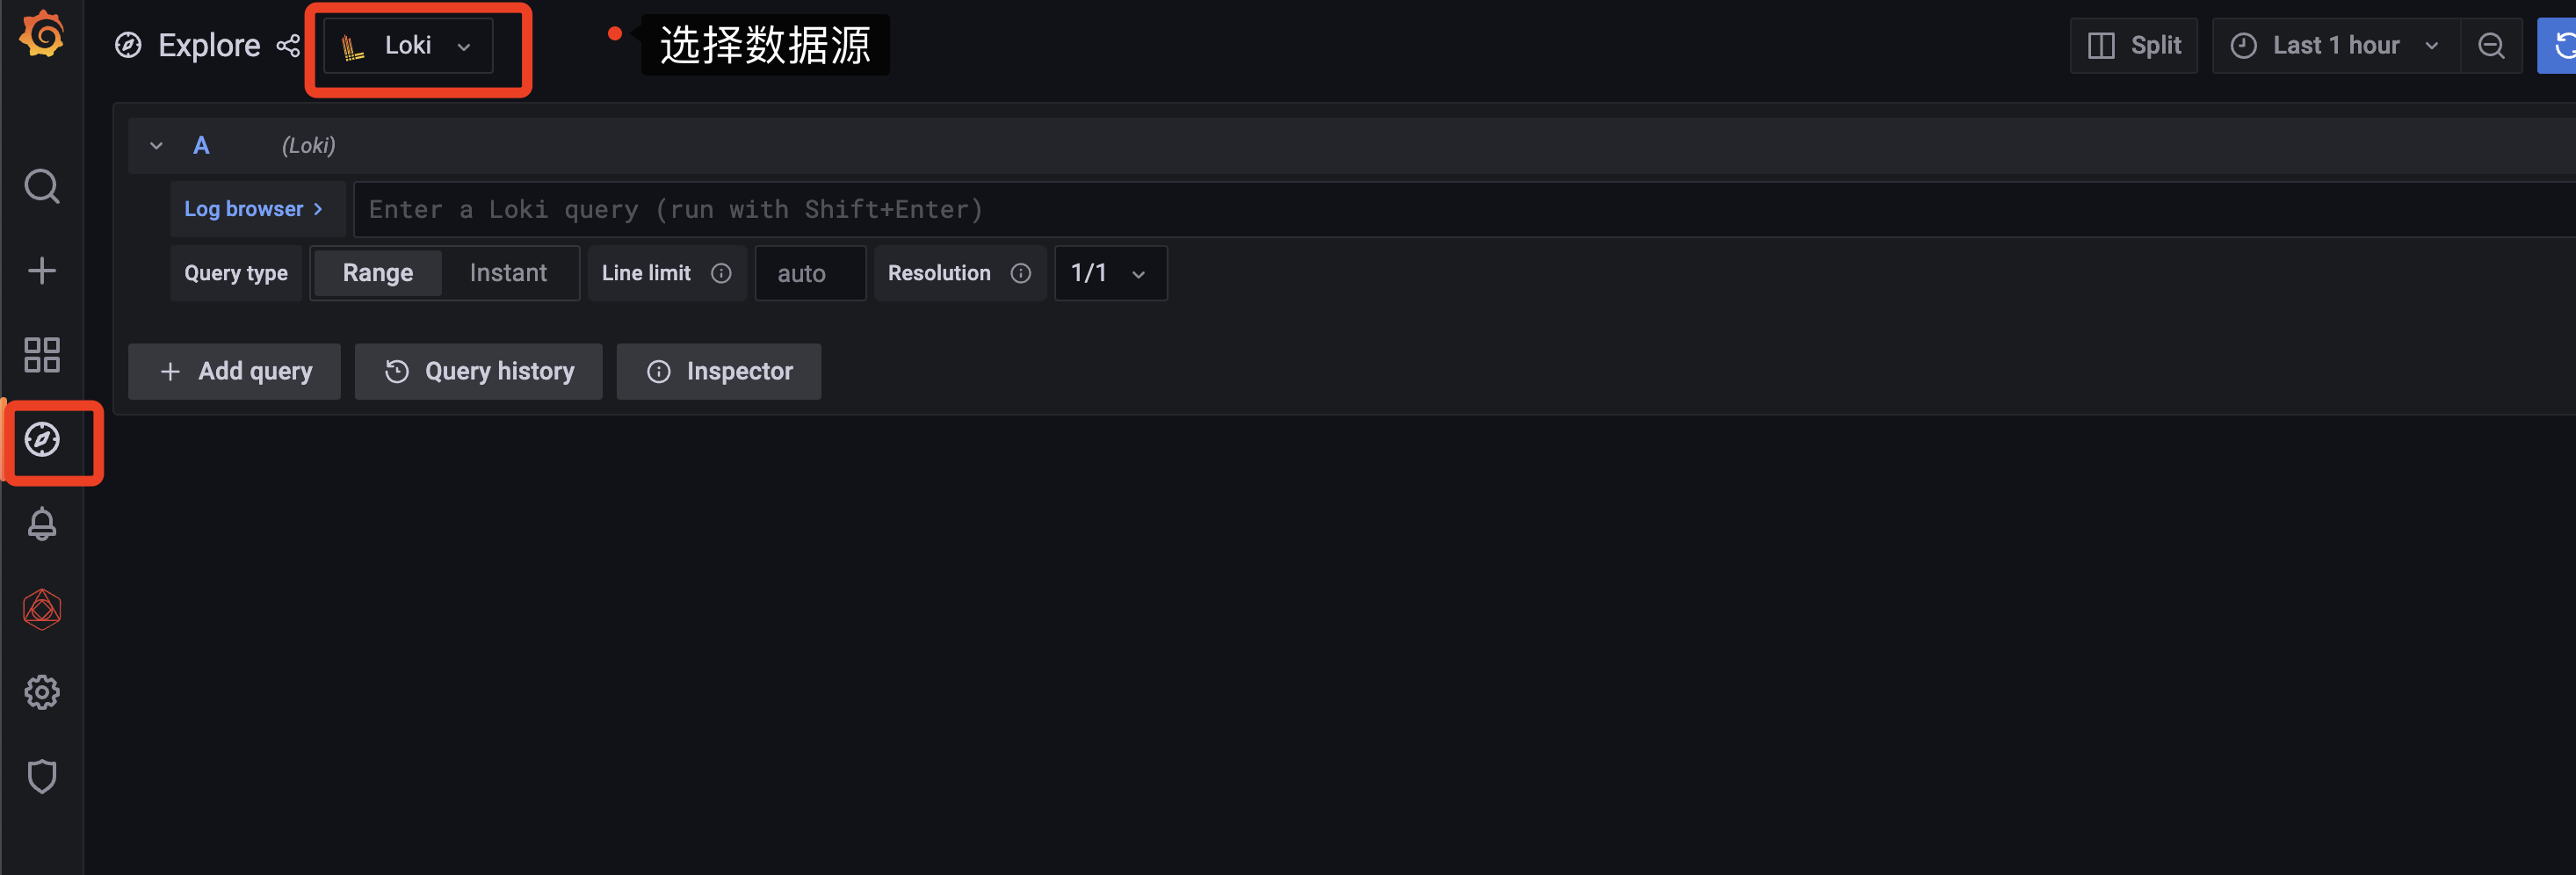
配置Loki连接地址
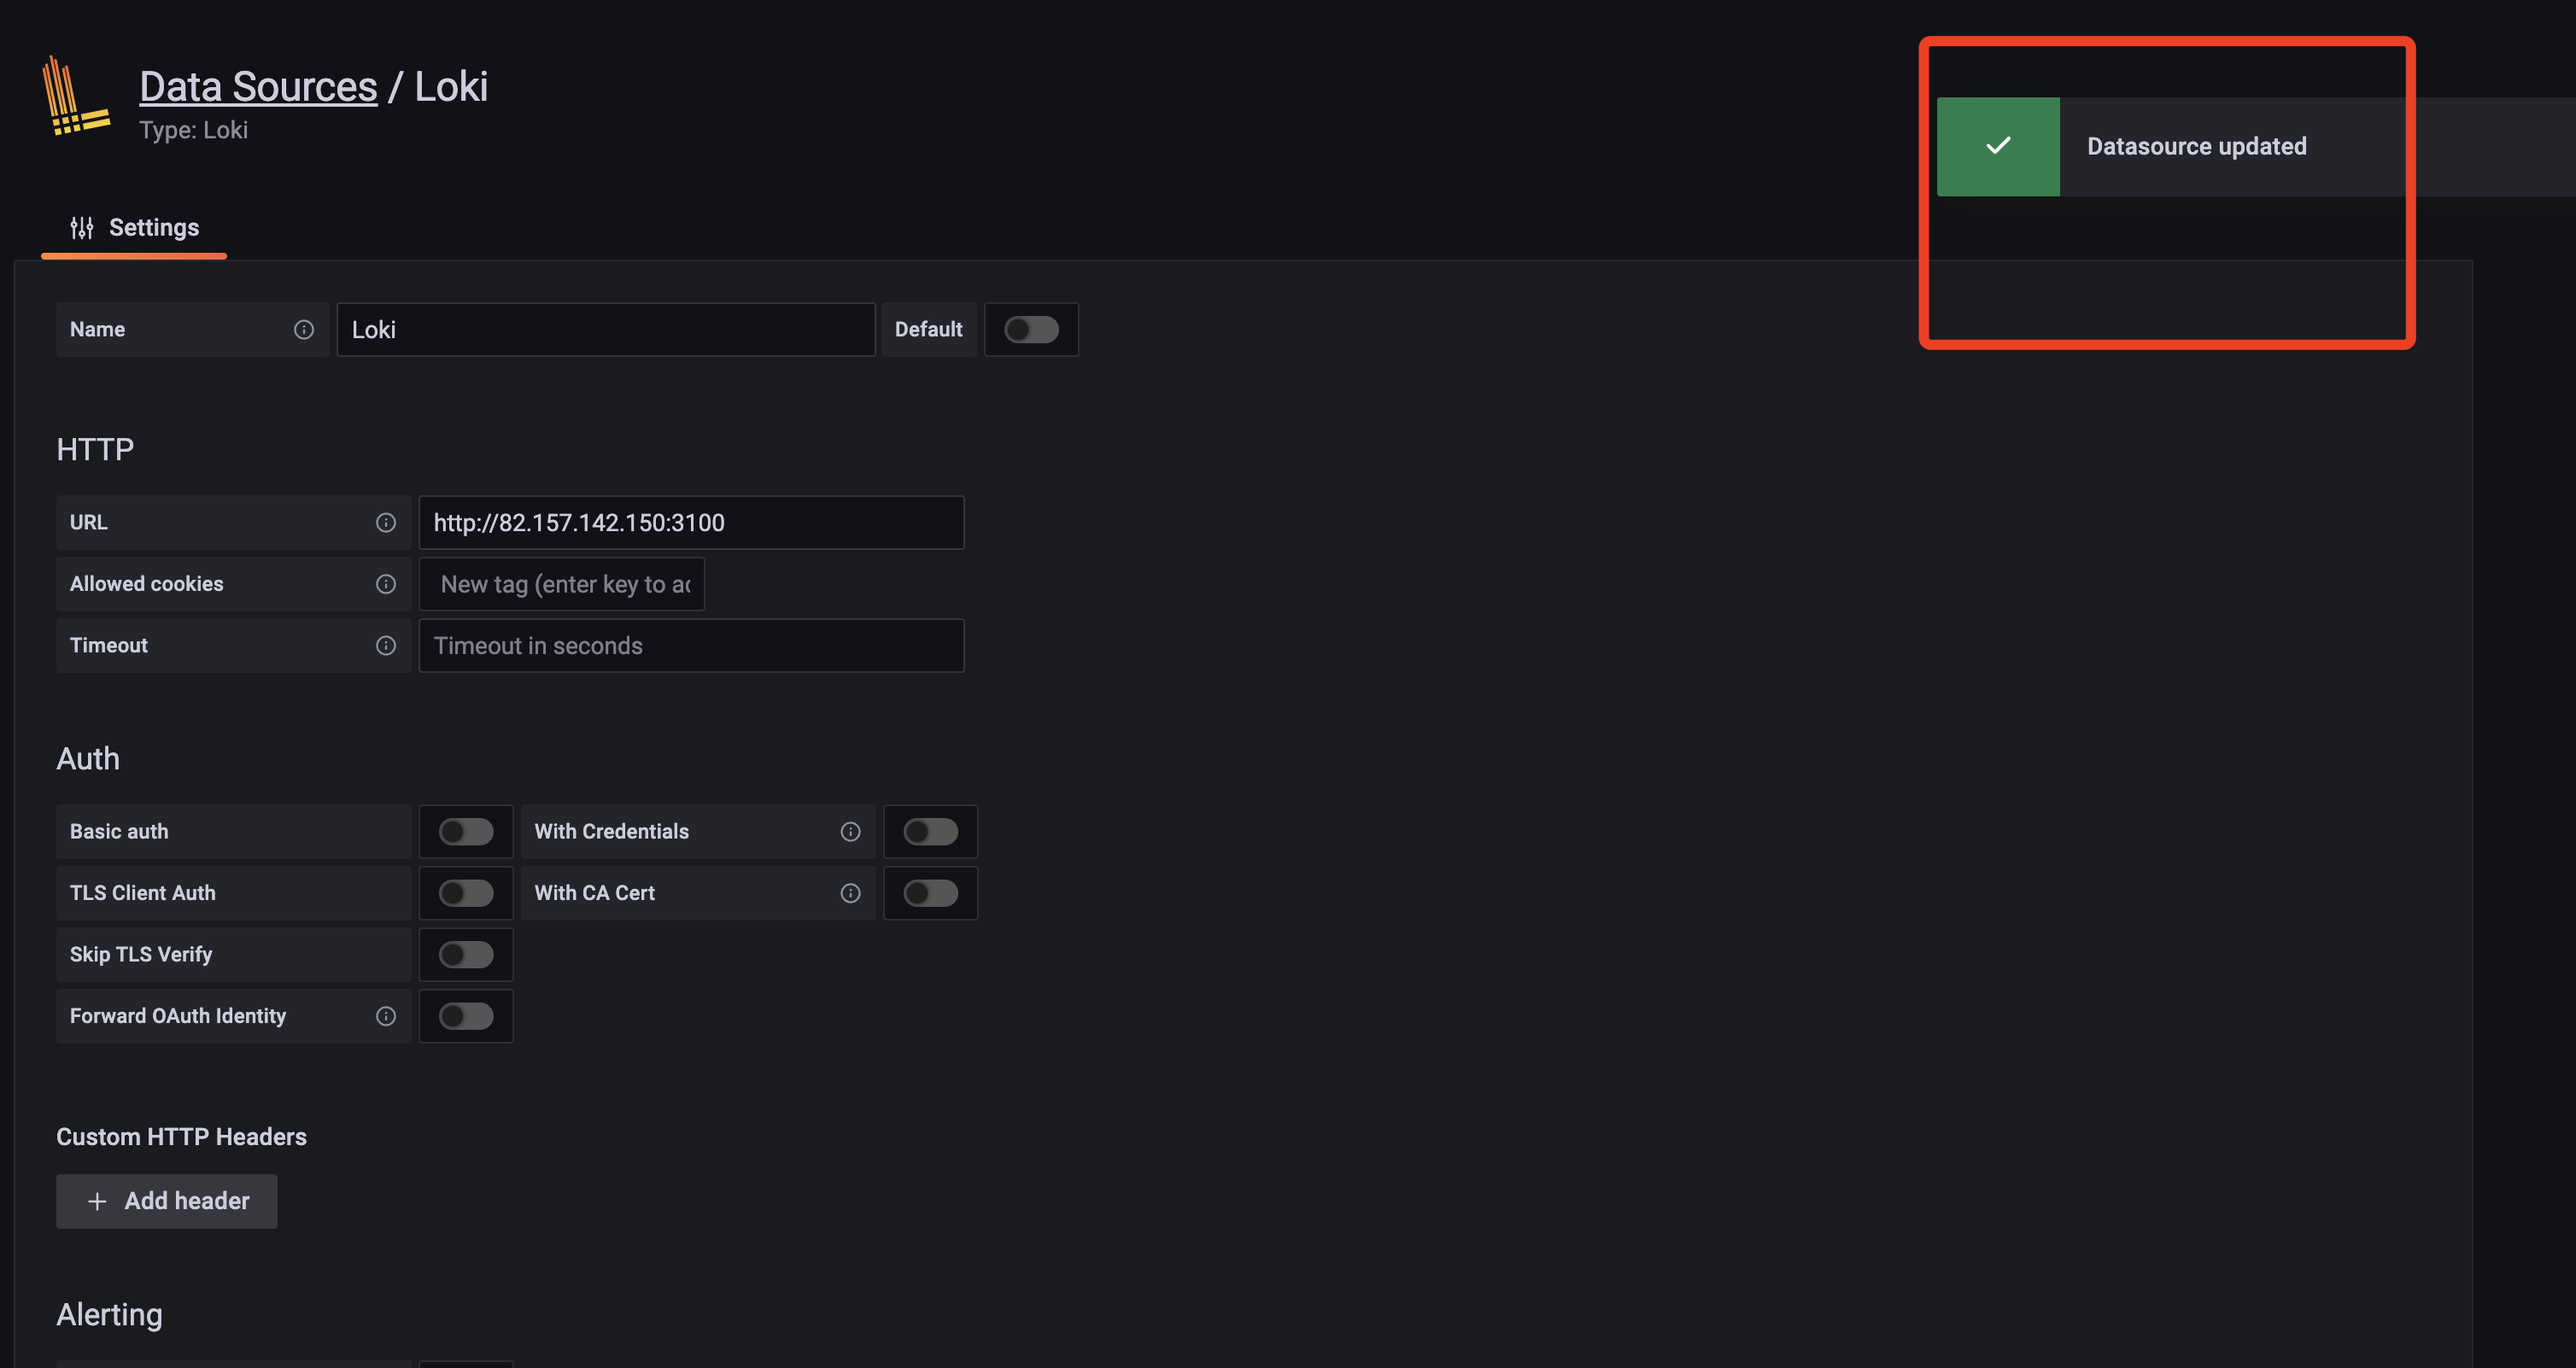
测试Loki是否获取到数据
筛选日志
- 出来日志路径基本上可以确认是可以获取到日志了
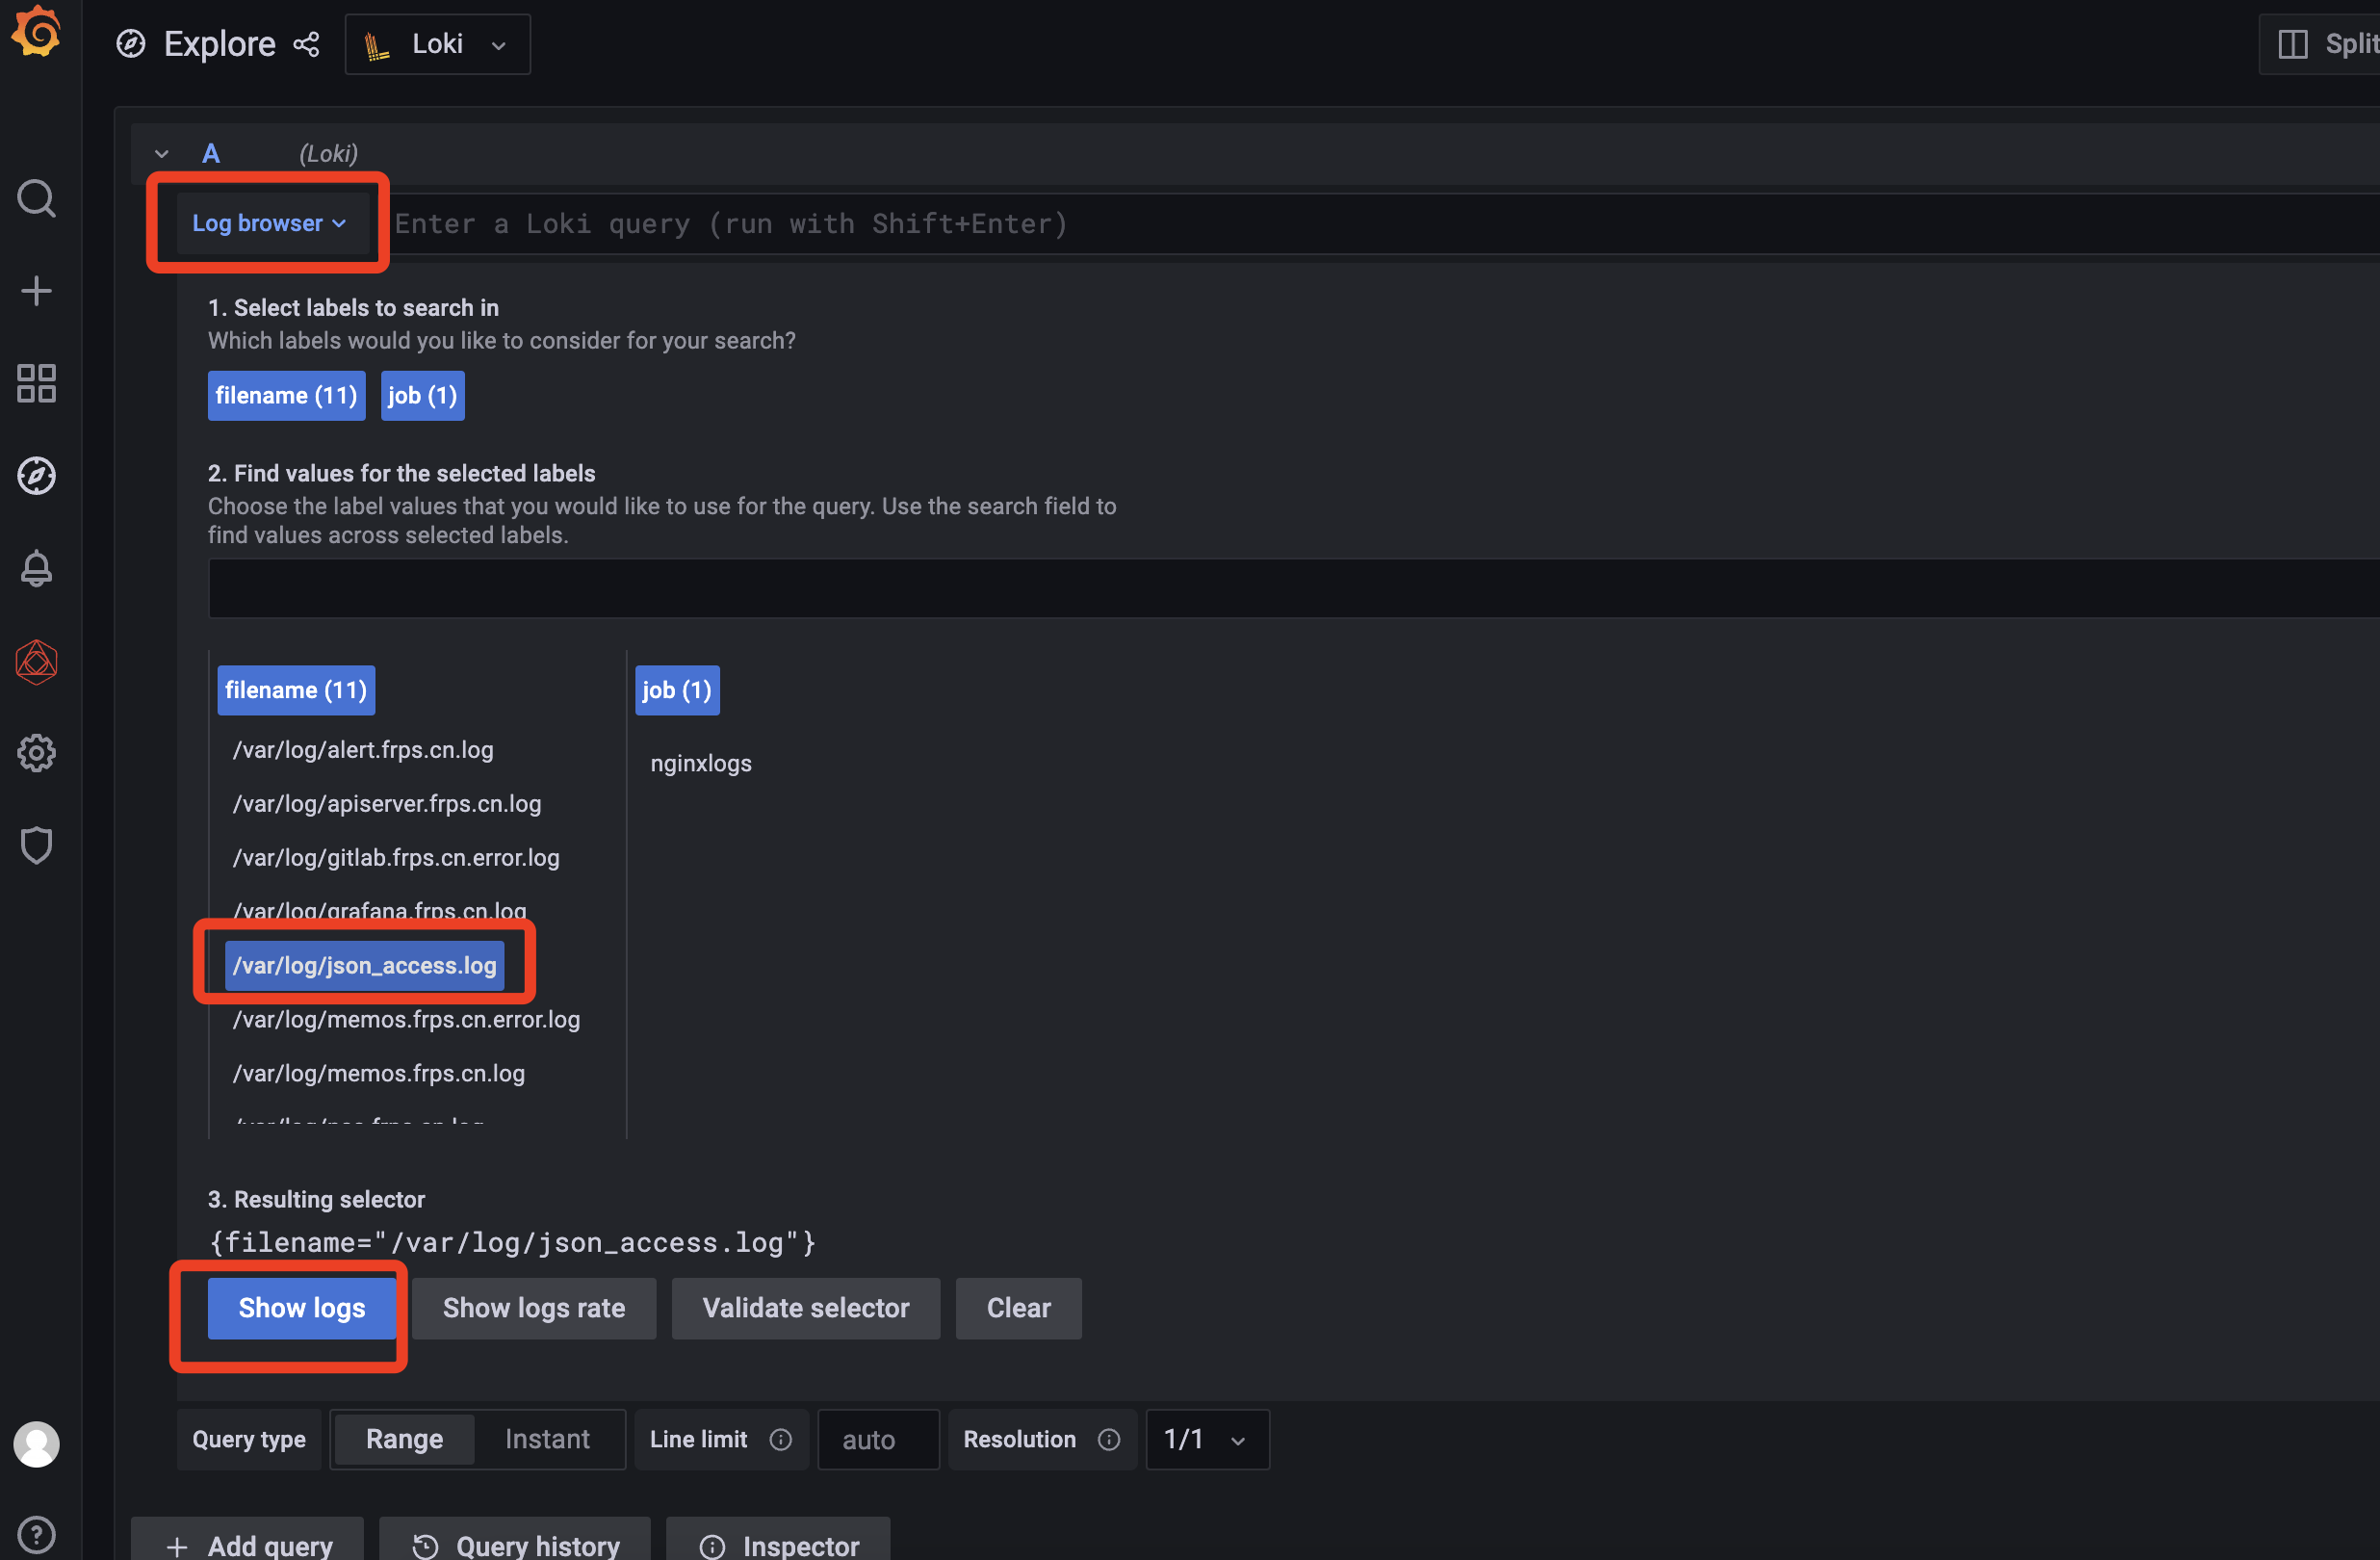
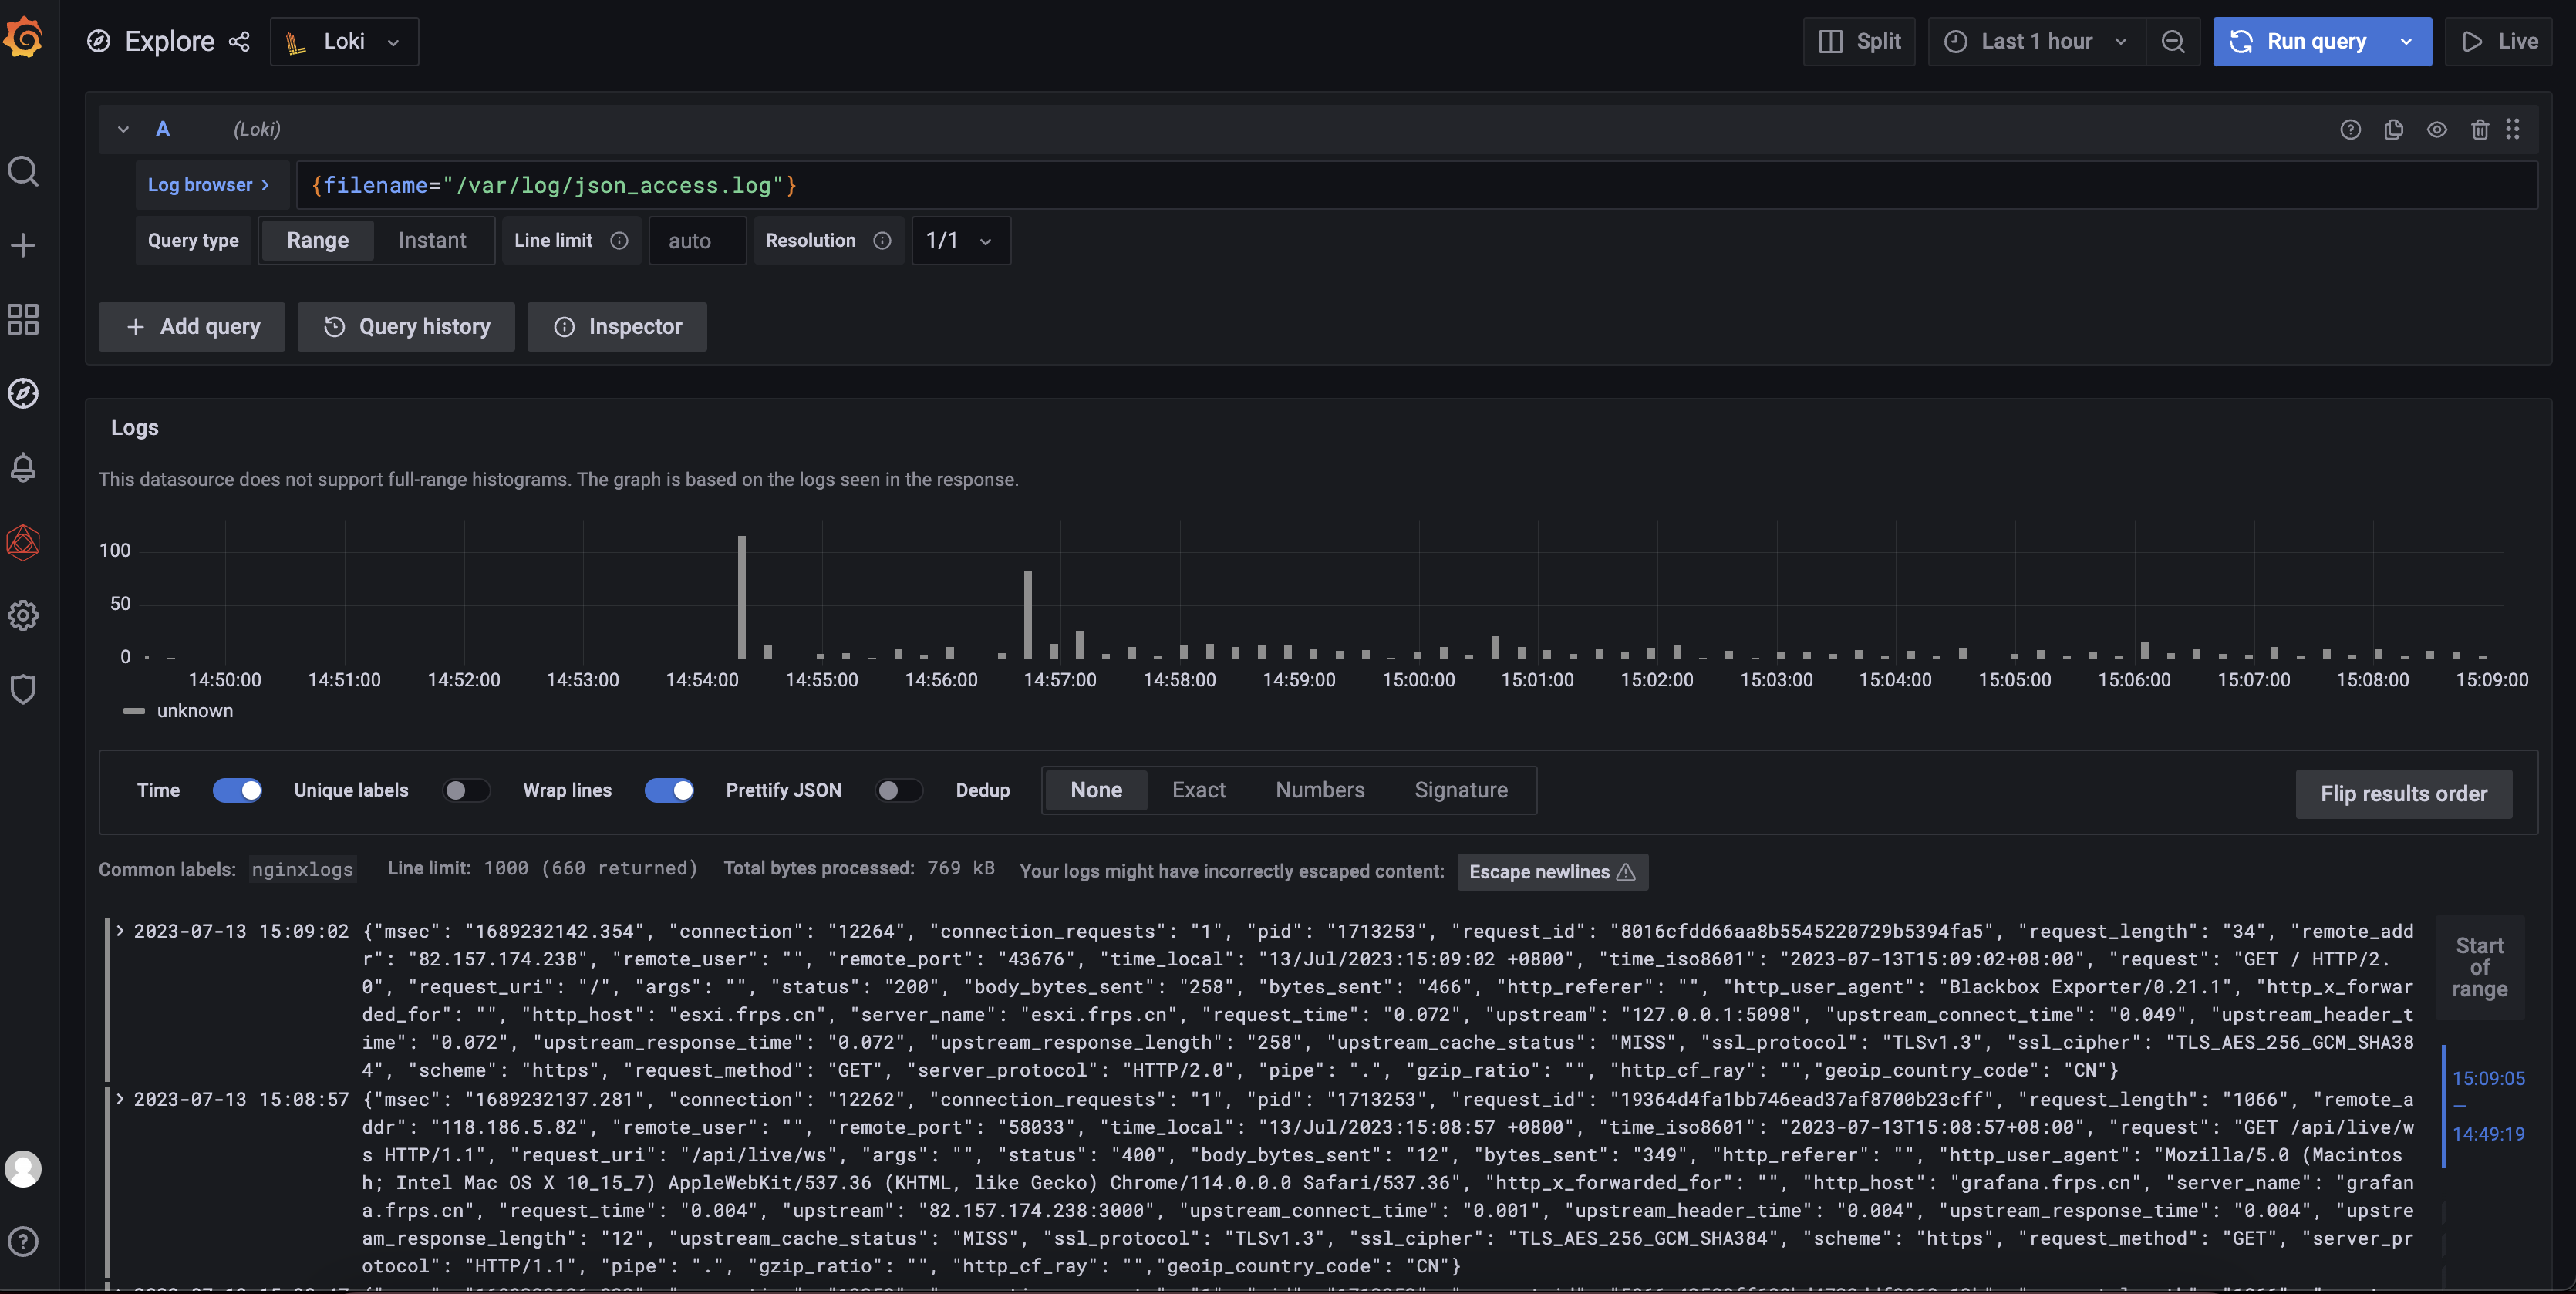
下面我们就可以看到日志了
新版本的不建议直接使用ID 12559 初次尝试发现数据有问题,采用下载旧版本在上传的方式
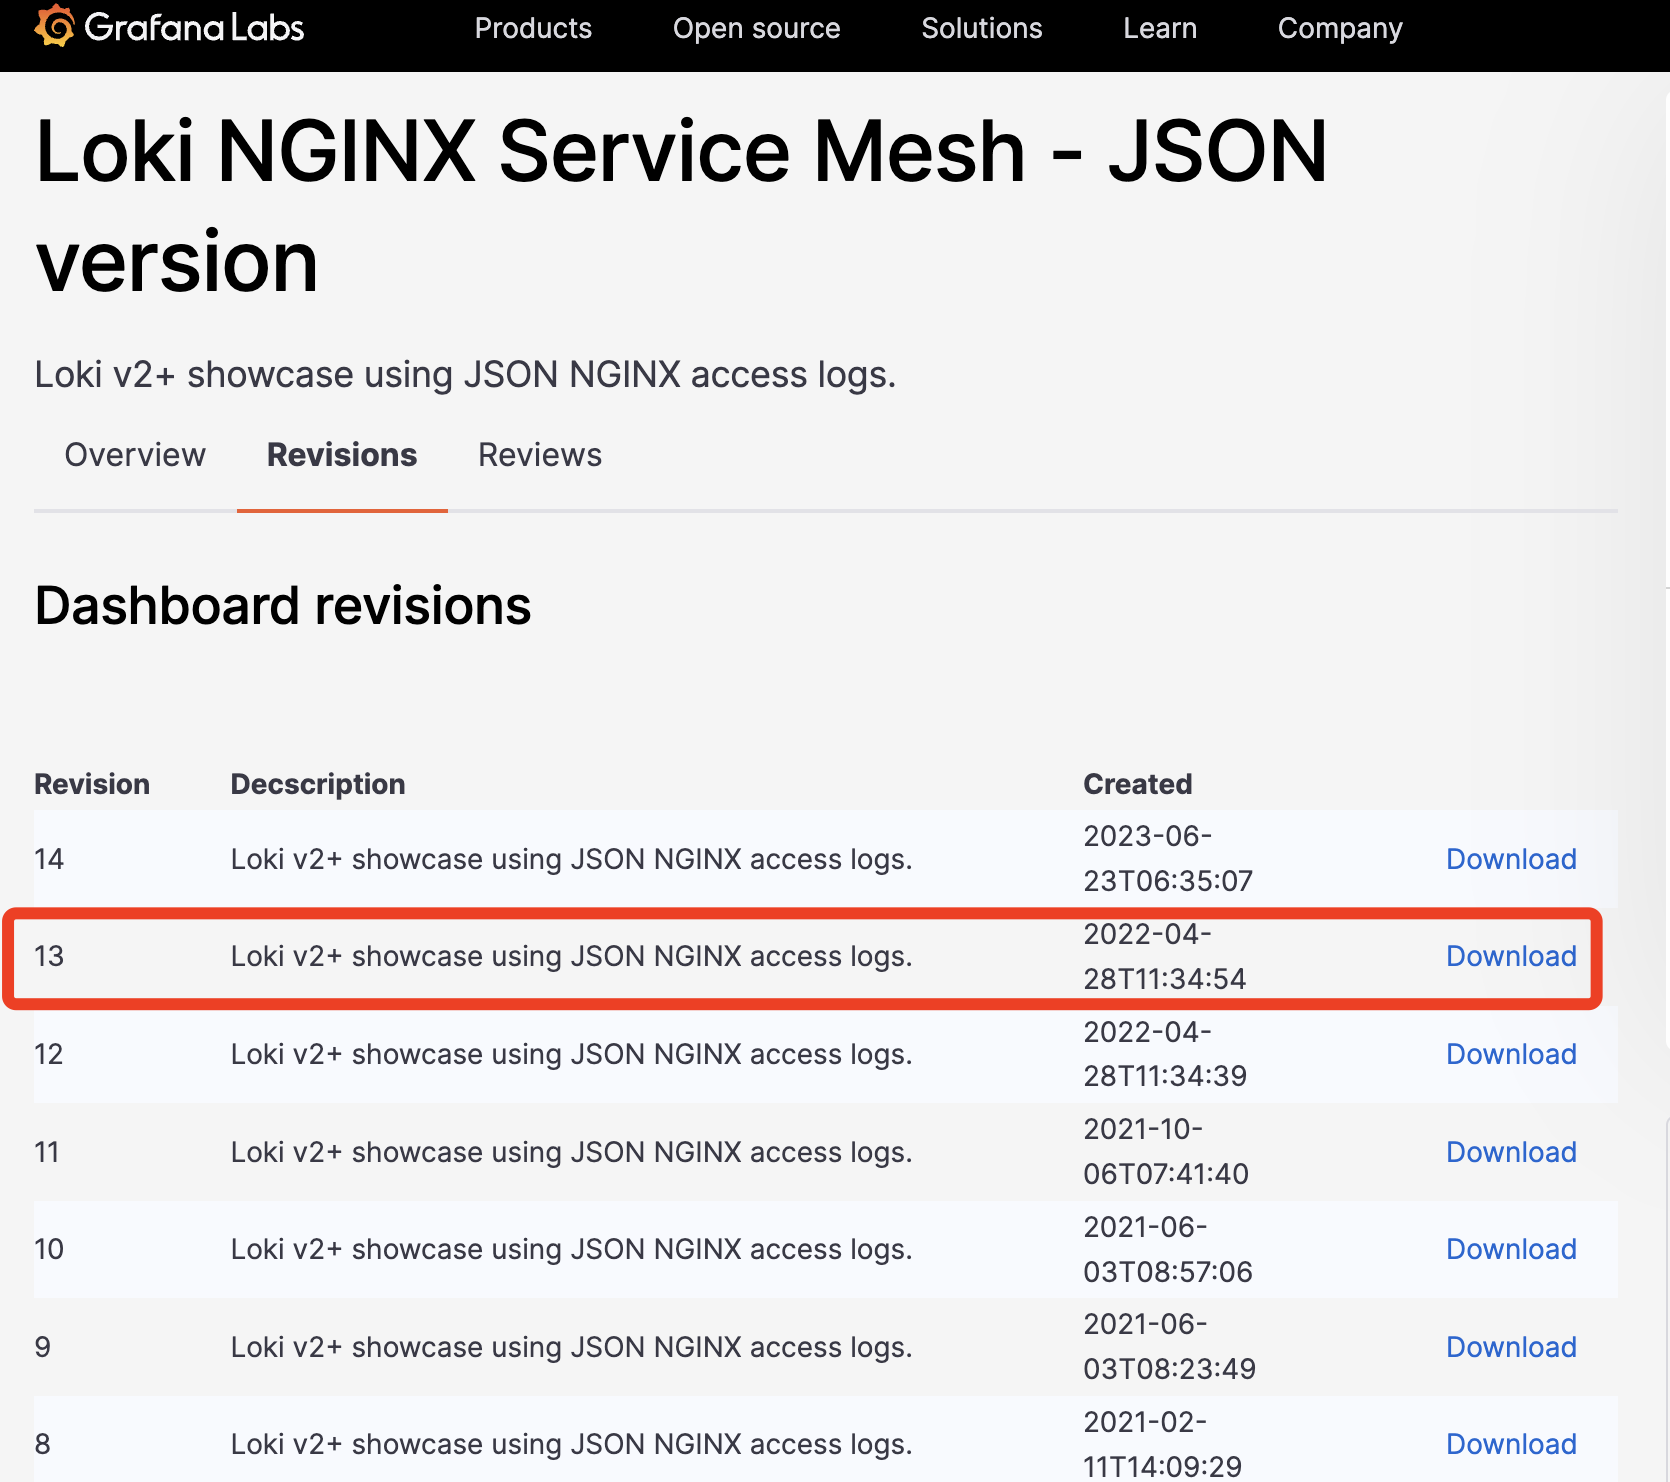
如果导入数据有问题,等待几分钟后在重新导入一遍模板就可以了
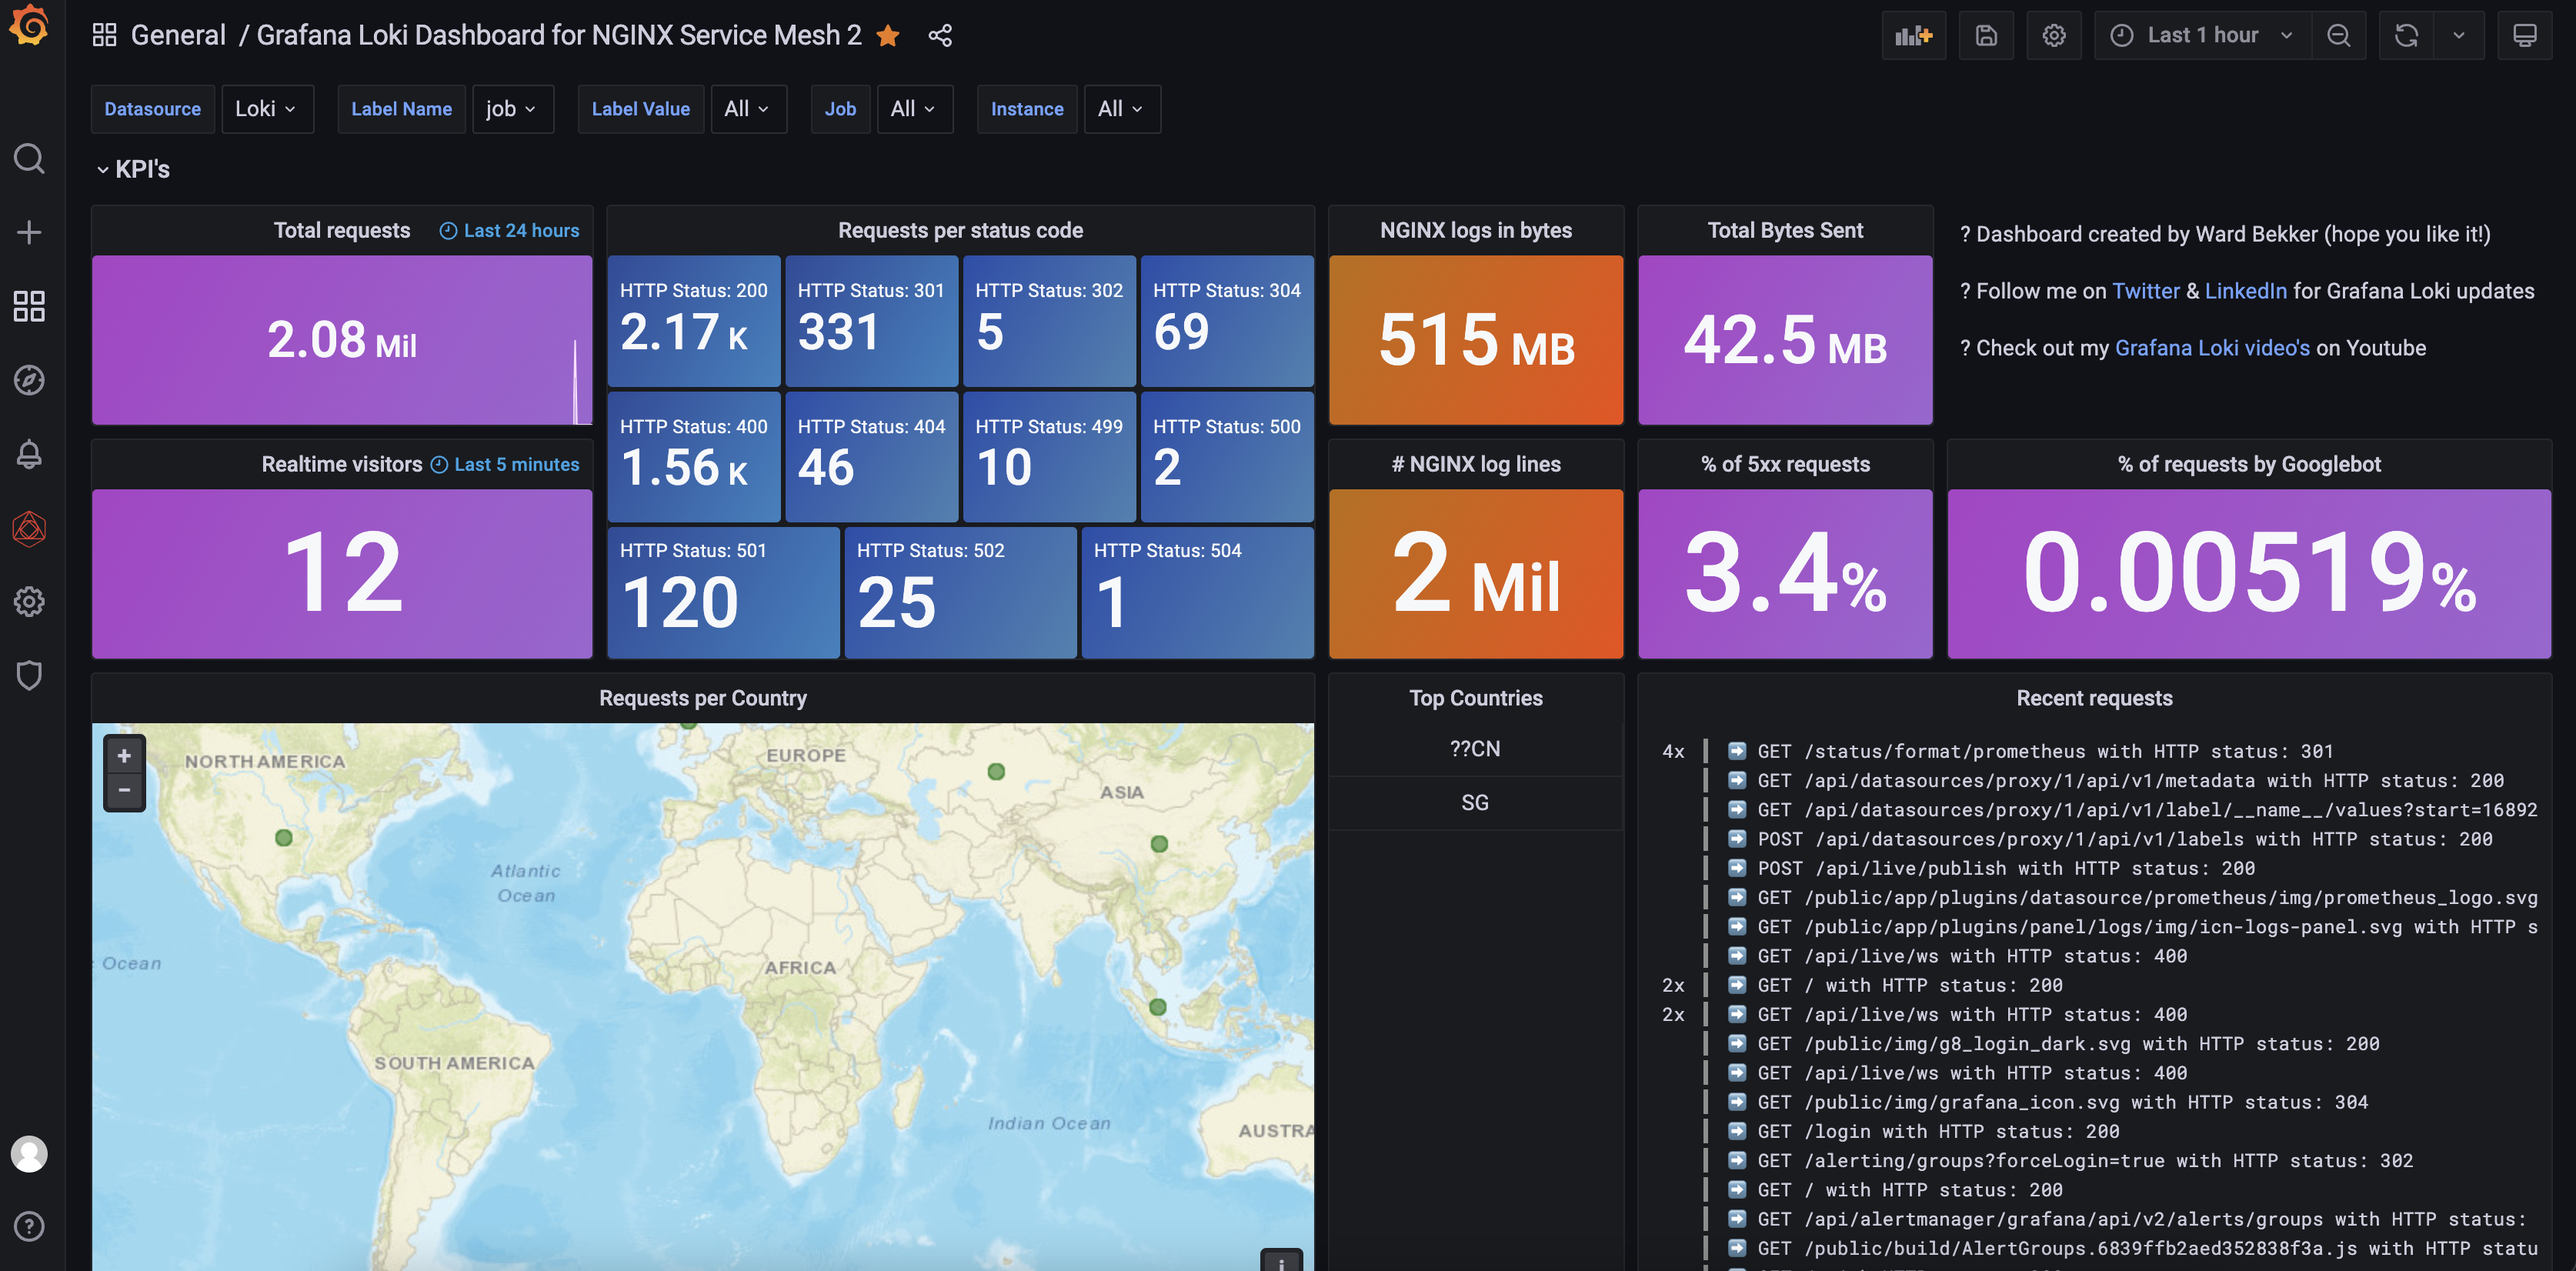
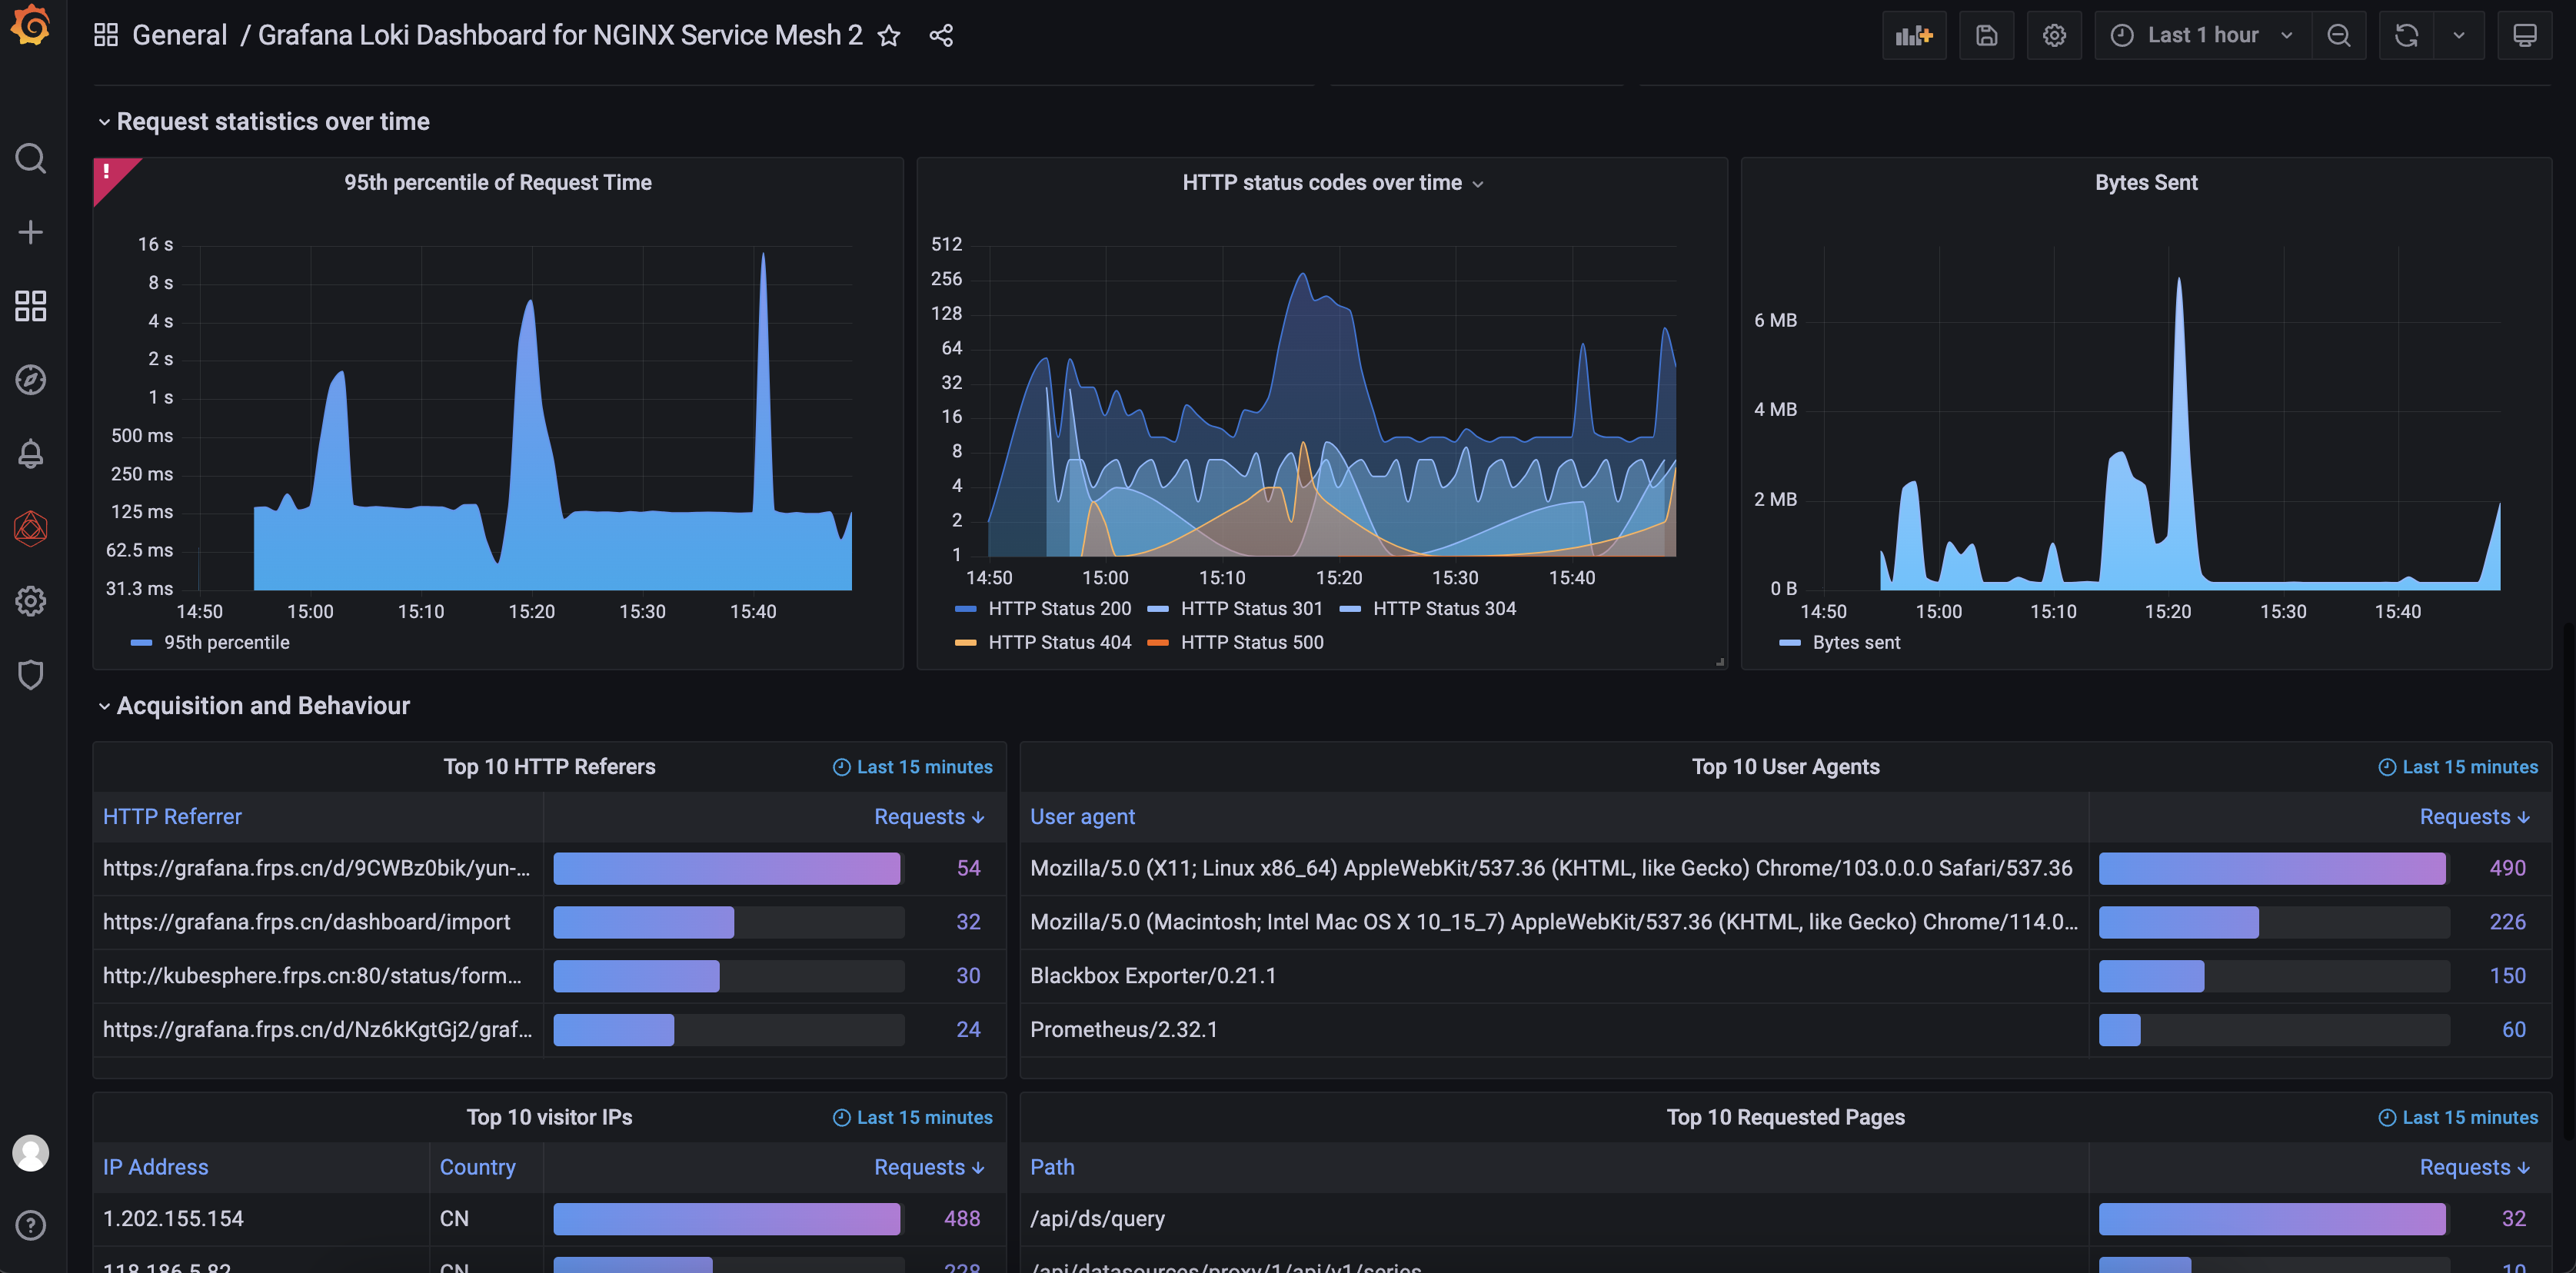
最终效果图


启动容器
docker run -d –name promtail
-v /www/wwwlogs:/var/log
-v /opt/config:/mnt/config
grafana/promtail
-config.file=/mnt/config/promtail-config.yaml
一直无法解析这个配置文件
容器日志: {“log”:”Unable to parse config: /mnt/config/promtail-config.yaml does not exist, set config.file for custom config pathn”,”stream”:”stdout”,”time”:”2023-11-10T03:48:40.961624273Z”}
/mnt/config/promtail-config.yaml 我是有这个文件的
还有具体的报错吗
没有其他报错了,就只是文件解析错误 我已经下载了官方的文件然后进行修改解决了 但是grafana可视化太多报错了